enter your nail width (in mm) for each finger — we'll match you to the right size automatically.

Thumb
mm
Index
mm
Middle
mm
Ring
mm
Pinky
mm
your recommended size

Nail width per finger (in millimeter)
size thumb index middle ring pinky
XS 14 mm10 mm11 mm10 mm8 mm
S 15 mm11 mm12 mm11 mm8 mm
M 16 mm12 mm13 mm12 mm9 mm
L 17 mm13 mm14 mm13 mm10 mm
✦ Sizing Tip
Between two sizes or have a flatter nail bed? always go a size up.
For nail beds that don't match XS / S / M / L exactly, you could pick a custom size when ordering and let us make each nail to your precise measurements.
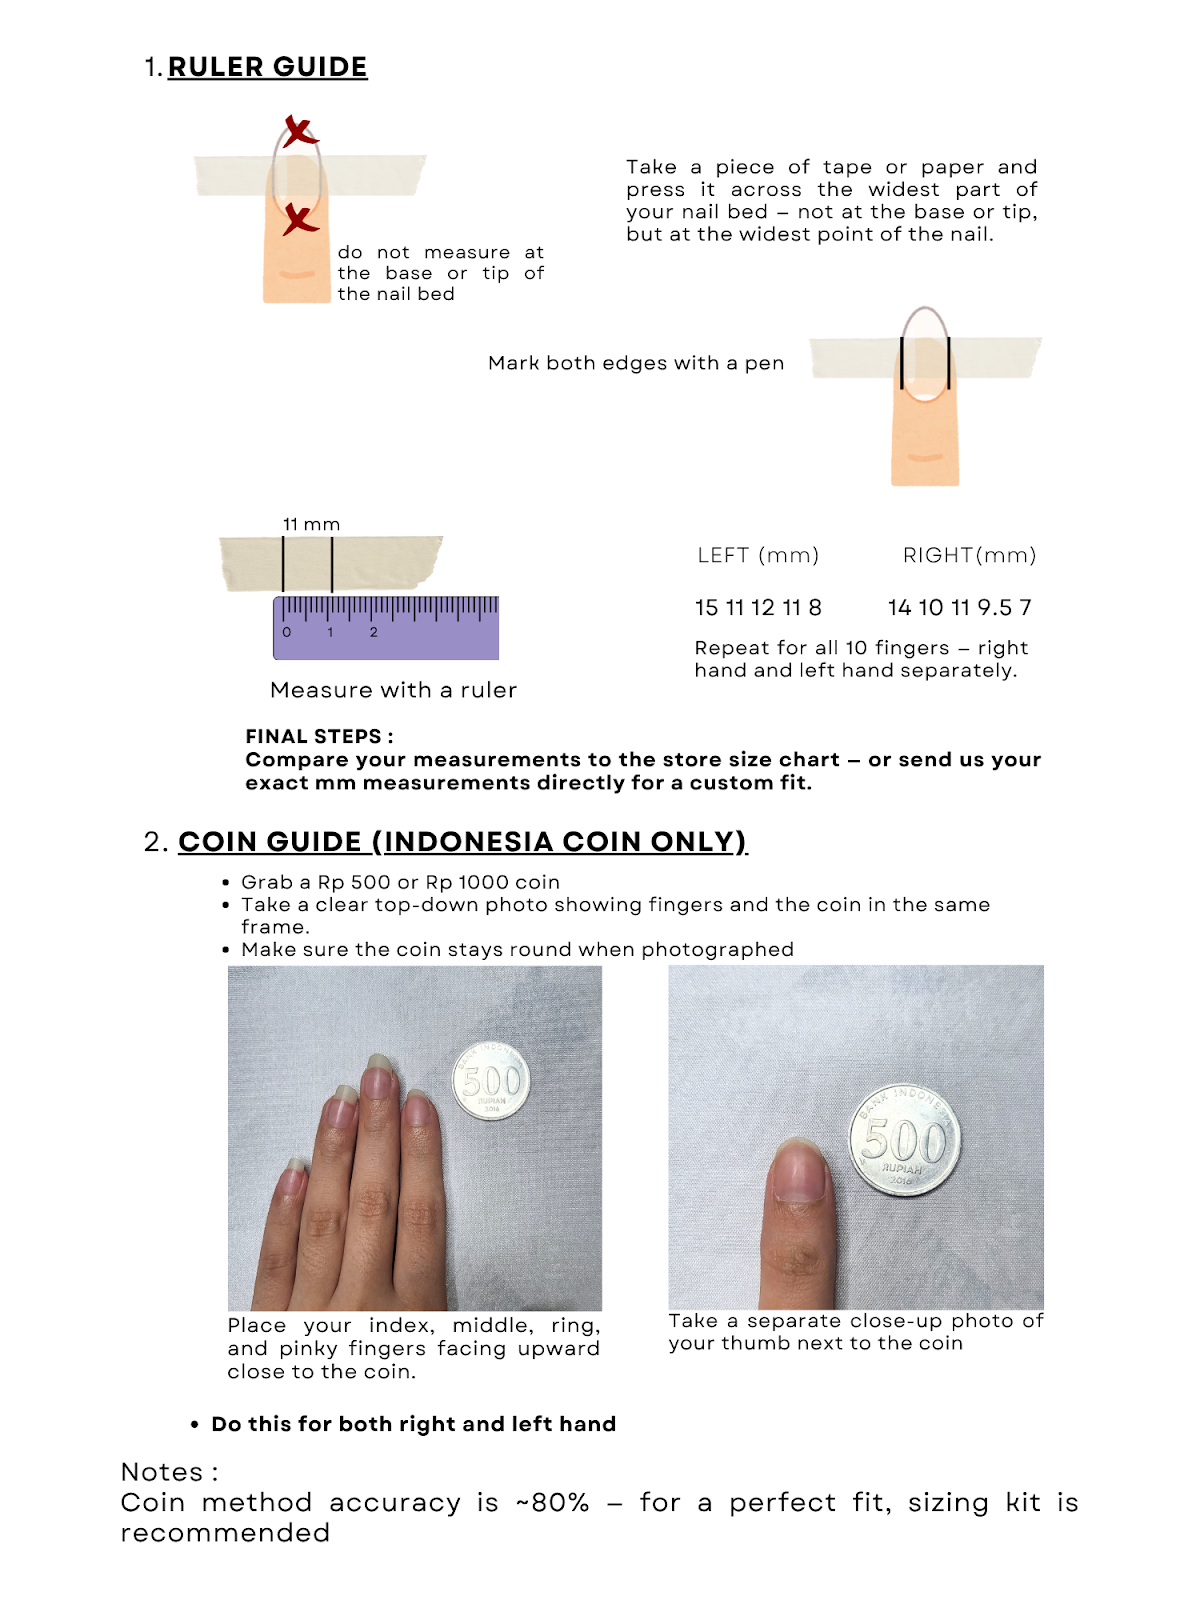
nail sizing guide
1
Prep your cuticles
Gently push back your cuticles using the cuticle pusher provided. This helps prevent glue from sticking to your skin and ensures a better fit.
2
Buff your nails
Lightly buff your natural nails using the buffer from the nail tool set. This creates a slightly rough surface so the glue can adhere more securely.
3
Cleanse your nails
Wipe your nails with the alcohol pads provided to remove any oil, dirt, or residue.
oil is the enemy of adhesion — make sure nails are fully clean and dry
4
Nail arrangement
Our press-on nails are already arranged in order from thumb to pinky. The top row is for your right hand and the bottom row is for your left hand.
5.1
Apply with liquid glue
Apply a thin layer of liquid glue to the press-on nail. Position it at a 45-degree angle, leaving a small gap between the press-on and your cuticle. Gently press and slide it toward the base of your nail.
pressing at a 45 angle from the cuticle gives a more natural look
5.2
Apply with jelly tab glue
Choose a jelly tab that matches your nail size and apply it evenly to cover the entire nail surface (you can use two if needed). Then apply the press-on at a 45-degree angle, leaving a small gap from the cuticle and press it down toward the base.
6
Press and hold
Press firmly on each nail for at least 30 seconds to ensure a strong, secure bond.
7
Avoid water exposure
Keep your nails dry for at least 3 hours after application for the best results.
for longest wear, apply at night before bed
1
Soak in warm soapy water
Fill a bowl with warm water and a few drops of dish soap. soak your nails for 10–15 minutes until you feel the edges beginning to loosen.
2
Gently wiggle from the sides
Use the tip of the cuticle pusher, gently wiggles the sides of each nail to slowly lift and loosen the press-on .
Do not pry from the tip.
3
Slide off carefully
Once loosened gently slide the nail off, avoid forcing it to prevent damage to your natural nails.
If resistance is felt, soak for another 5 minutes — never force it.
4
Clean off any glue residue
1. For liquid glue, buff residue off using a nail buffer.
2. For jelly tabs, slowly roll or lift off the adhesive using the pointed end of a cuticle pusher.
5
Clean and store for reuse
Remove any leftover glue from the press-on nails
1. For liquid glue, lightly buff or use a nail drill to clean the surface.
2. For jelly tabs, gently remove the adhesive using a cuticle pusher.
Once clean, store your nails properly for future use.
Never do these — they damage your nails
Peel or rip press-ons off — this pulls layers off your natural nail
Use acetone directly on the press-on if you want to reuse it — it dissolves the design
Force removal before soaking — always let the water do the work first
Use a metal tool to pry from the cuticle edge — always work from the sides
💧
Avoid prolonged water exposure
Short handwashing is fine, but avoid soaking your hands — long baths, swimming, or doing dishes without gloves will shorten wear time significantly.
🧤
Wear gloves for housework
For cleaning, washing dishes, or any activity involving chemicals or lots of water, wear rubber gloves to protect both the design and adhesion.
📦
Store carefully between uses
Keep press-on nails in the original box when not worn. avoid heat or direct sunlight — these can warp the shape and dull the finish over time.
🌸
Treat them gently
Press-on nails aren't tools — avoid using them to open cans, peel stickers, or type hard. the gentler you are, the longer they last.
♻ Reusing your set
With careful removal and gentle cleaning, most sets can be worn several time. after removing, clean the back of each nail with alcohol pad, let fully dry, store flat in the box.
If you're using glue, recommended to remove excess glue from your press-on nails using buffer or electric file before applying for best adhesion.
Ready to find your perfect set?
Now that you know your size and how to care for them — browse the shop.
browse the shop
made with care in Indonesia  ·  ✿ uaenails